4.9 1890+ Google Reviews

One of the most common questions we get from homebuyers, Realtors, and even roofers is "what is kick out flashing?" It's quite fascinating how integral this little piece of metal is.
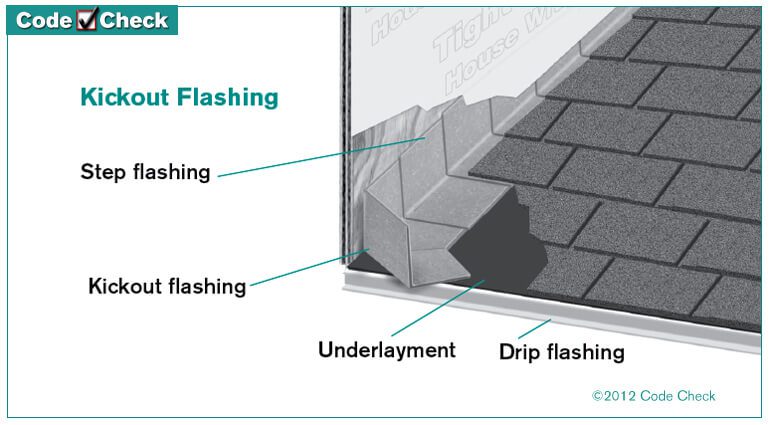
Kick-out flashing, also known as diverter flashing, is flashing installed at roof-wall intersections to prevent water damage. In other words, it is flashing installed at the bottom of a roof surface that meets a vertical wall. Together with properly installed step flashing, siding and house wrap, the exterior wall gets protected from water damage.

Roofers install step flashing between the shingles and a vertical sidewall to prevent water penetration. Specifically, it’s made up of small sections of metal lapped into each shingle separately. Whereas channel, or continuous flashing is one long piece of metal that is installed under all the shingles.
After the step flashing is installed, the house wrap and siding get installed on top acting as counter flashing.
Next, the contractor installs house wrap and siding over the step flashing to act as the counter flashing.
The video below shows how kick out flashing will direct water into the rain gutters. Ultimately, the goal is a building envelope that resists water intrusion.
Simply put, without kick out flashing, your home is subject to water and mold damage. A typical roof with handle about 1000 gallons of water per inch of rain. Obviously it’s much higher during heavy rains. This means all of the roof penetrations and intersections need to be well flashed to prevent water leaks.
As water runoff reaches the edge of the roof, most of it will flow into the gutter system. However, there is always a little gap between the gutter and the wall assembly. Water running down corner of the roof and wall can get behind the siding and cause serious damage.
In short, this one piece of flashing completes the system and protects your home.
The video below shows a lot of damage caused by rain water getting behind the vinyl siding.
Yes, kick out flashing has been required by building code since at least 2000. Specifically, theIRC (international residential code) requires kick out flashing in at least three places.
First, it’s in section R703.8 Flashing.
“Apply approved corrosion resistant flashing shingle-fashion to prevent water from entering into wall cavities or from penetrating into building structural framing components. Self-adhered flashing must comply with AAMA 711. Extend flashing at exterior window and door openings to the surface of the exterior wall finish or to the water-resistive barrier. Install flashing at the following locations…6 – At wall and roof intersections”
Second, its even clearer in the 2009 IRC R905.2.8.3
Sidewall Flashing. “Flashing against a vertical sidewall shall be by the step-flashing method. The flashing shall be a minimum of 4 inches (102 mm) high and 4 inches (102 mm) wide. At the end of the vertical sidewall, the step flashing shall be turned out in a manner that directs water away from the wall and onto the roof and/or gutter”
And in 2015 they added language to the IRC in Section r903.2.
“Flashing is required at wall and roof intersections and to divert water away from where the eave of a sloped roof intersects a vertical sidewall. ”
In either case, it’s clearly not just a best practice. Kick out flashing has been required by code since at least 2000.
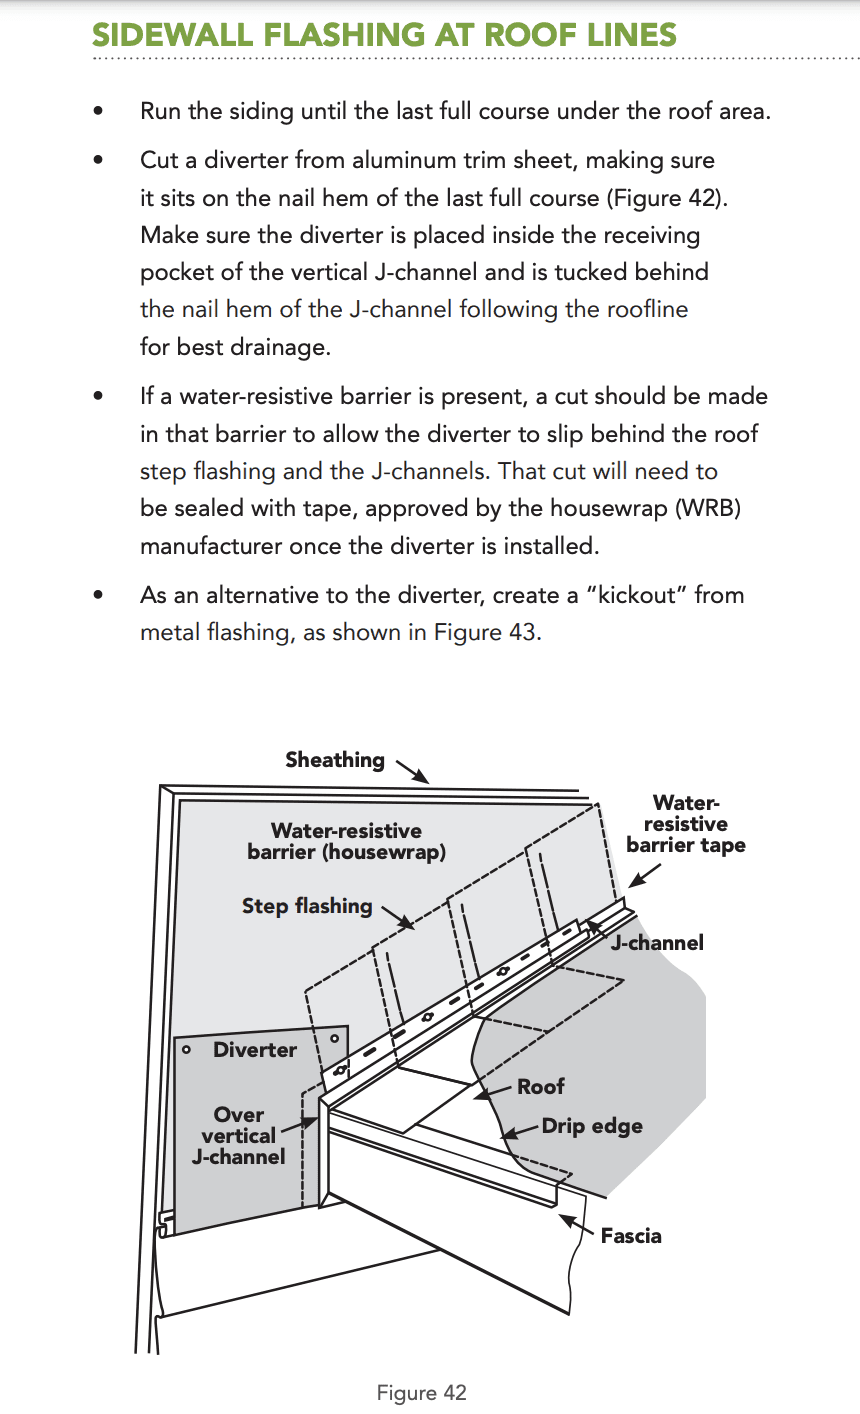
Unfortunately, home inspectors and contractors use the terms kick-out flashing, diverter flashing and kick-out diverter interchangeably. It is important to realize that kick out flashing and diverters are two separate things. In fact, many home inspectors erroneously write up missing kick out flashing. The photo below shows an excerpt from the vinyl siding institute on how to install a diverter.
The diverter meets code and will stop moisture intrusion into wall. Obviously it’s not a solution for certain siding like brick, or stucco.

Older homes and frequently even new construction homes don’t have kick out flashing, or diverter flashing. Obviously, I would definitely recommend being proactive and installing it before you run into problems. It’s a cheap piece of flashing and weather vane roofing has a great video on how to do it.
First, it needs to behind the exterior cladding and building wrap.
Second, it needs to go under the first shingle and behind the first piece of sidewall flashing.

Roof Replacement Cost Calculator
What is Roof Flashing? – Code, Purpose, and Types
Year 11 of your “20 Year Roof”
Can a Roof Have Two Layers of Shingles?
Rafters VS Roof Trusses: Complete Structural Guide
Top 5 Roofing Materials in Virginia