4.9 1890+ Google Reviews

Virginia radon map with "is there radon in chesterfield" laid over the map

Chesterfield Radon - High Potential EPA Zone 

This guide breaks down everything you need to know about radon gas in Chesterfield, VA—from local risk levels to testing, fluctuations, and mitigation.

Important Note
All Homes Have Radon. In fact, the average national indoor radon level is 1.3 pCi/L. Your mission is to understand the radon levels in your home, their impact on your health, and what you can do about it.

Quick Facts about Chesterfield Radon Levels

  • Chesterfield, Virginia, is in EPA Zone 1. So, homes in this area face the highest risk of elevated radon levels.
  • ANY foundation can lead to high radon levels.
  • Professional Radon testing costs $200-$300.
  • A professionally installed radon mitigation system costs around $ 2,000- $ 3,000.
  • Long-term exposure to high radon levels increases your risk of lung cancer.

How to Test Your Home For Radon

When it comes to testing indoor radon levels, you can either test them yourself or hire a professional. Obviously, hiring a professional is the easiest and most reliable, but also the most expensive. 

Professional Radon Testing in Chesterfield 

Fortunately, there is a brilliant and passionate radon tester here in Chesterfield, va.  Wally Dorsey with Radon Ease can tackle all of your radon testing needs.

DIY Radon Testing

An important aspect of radon levels is that they fluctuate. In fact, they fluctuate hourly, monthly, and seasonally. For example, winter months generally produce higher indoor radon levels. Likewise, longer tests convey a more accurate picture of your average radon level. That is why a continuous radon monitor is the best option for homeowners.

Step-by-step: how to do a 90-day EcoQube test

  1. Pick the room first.
    Put the EcoQube in the lowest occupied or livable level of the house, such as a basement, family room, den, office, bedroom, or the first floor if the basement is not used regularly. Choose a room used regularly, not a storage room.
  2. Place the device.
    Put it at least 20 inches above the floor and at least 20 inches from the wall. Keep it away from windows, exterior doors, exterior walls, fans, supply registers, direct drafts, high heat, and high humidity. Do not place it in a kitchen or bathroom or closet. Ecosense also recommends keeping it at least 2 feet away from Wi-Fi routers or hotspots to reduce interference.
  3. Plug in the EcoQube and leave it powered continuously.
    EcoQube starts reading quickly, with a first reading in about 10 minutes, more reliable results in about 1 hour, and better accuracy after about 10 hours. For a 90-day test, the important part is to keep it running the whole time continuously.
  4. Download the app and sign in.
    Install the Ecosense app from the Apple App Store or Google Play, then sign in or create an account.
  5. Follow the Directions in the App.
  6. Do not move it for the full test period.
    Leave the EcoQube in the exact same spot for the entire 90 days. If you move it to another room, you should start a new session, because mixing rooms ruins the usefulness of the long-term average for that location. Ecosense says each new session creates a fresh dataset for the new room.
  7. Live in the house normally.
    For this kind of continuous home monitoring, Ecosense says you do not need to stay out of the room. Keep using the house as usual so the monitor reflects your normal exposure pattern.
  8. Avoid unusual ventilation habits during the test.
    For a long monitoring period like this, the goal is a normal, representative average. Do not leave windows open for extended periods, run ventilation systems for extended periods, or keep exterior doors propped open. Ecosense specifically recommends minimizing sudden changes in ventilation, and EPA guidance treats tests lasting 2 to 90 days as short-term measurements to be conducted under closed-building conditions.
  9. Check the app periodically, but do not “restart” anything.
    The app will show live readings and charts after the first hour, with selectable periods of 1 day, 3 days, 7 days, 30 days, and 1 year. For a 90-day test, just let the session keep building. Do not delete the device, start over, or factory reset it during the test.
  10. At 90 days, review the long-term result.
    Open the app and look at the long-term chart history. Since the app supports a 1-year view, you can review the 90-day span there. The point of the 90-day run is to get a better picture of the home’s typical radon level than you would get from a short snapshot. EPA says long-term testing gives a better sense of the home’s year-round average radon level than short-term testing.

Best placement rules in plain English

Use these as your checklist:

  • Lowest livable level
  • At least 20 inches above the floor
  • At least 20 inches from the wall
  • Not near windows, doors, drafts, vents, or exterior walls
  • Not in the kitchen, closet,  bathroom, laundry area, or furnace room
  • Not near high humidity or heat
  • Not where kids, pets, or vacuuming will disturb it
  • At least 2 feet from a Wi-Fi router or hotspot

What conditions should the house be in

For a 90-day continuous test with an EcoQube, the best approach is:

  • Normal lived-in conditions
  • Normal HVAC operation
  • Normal entry and exit
  • No extended window-opening habits
  • No unusual whole-house airing out
  • No moving the device
  • No starting and stopping sessions

One important nuance: EPA’s strict “closed-building conditions” language applies to tests lasting up to 90 days, whereas long-term home monitoring is most valuable for capturing normal fluctuations over time. So for your practical use, I’d keep the house as normal as possible, but not unusually ventilated. That gives you the most useful real-world number.

A few mistakes to avoid

  • Putting it in an unfinished storage basement corner
  • Setting it right beside a sump pit, window, or supply vent
  • Moving it from room to room during the 90 days
  • Resetting the device midway through
  • Judging the house based on the first day or two only

What result matters

EPA’s action level is 4.0 pCi/L. EPA says if a long-term test result is 4.0 pCi/L or higher, the home should be fixed.

Understanding Your Radon Test Results

Here’s how to interpret your results:

Under 2.0 pCi/L — Ideal

  • Low risk
  • Continue periodic testing

2.0–4.0 pCi/L — Caution Zone

  • Consider mitigation
  • Especially if the basement is used regularly

4.0+ pCi/L — Take Action

  • EPA recommends fixing the home
  • Confirm with a second test, then mitigate

What if Your House has High Radon Levels?

Here in Chesterfield, about 1 in 4 tested homes have high levels of radon. If you're in that 25%, then you'll need professional radon mitigation. Look for an NRSB or NRPP-certified radon mitigation specialist. Ensure they have a strong reputation in the community. It's worth giving Commonwealth Environmental a call here in Richmond.

Chart showing virginia radon zones including chesterfield in zone 1

Is Radon Exposure a Problem in Chesterfield, VA?

Yes, Chesterfield Falls in a Higher-Risk Area

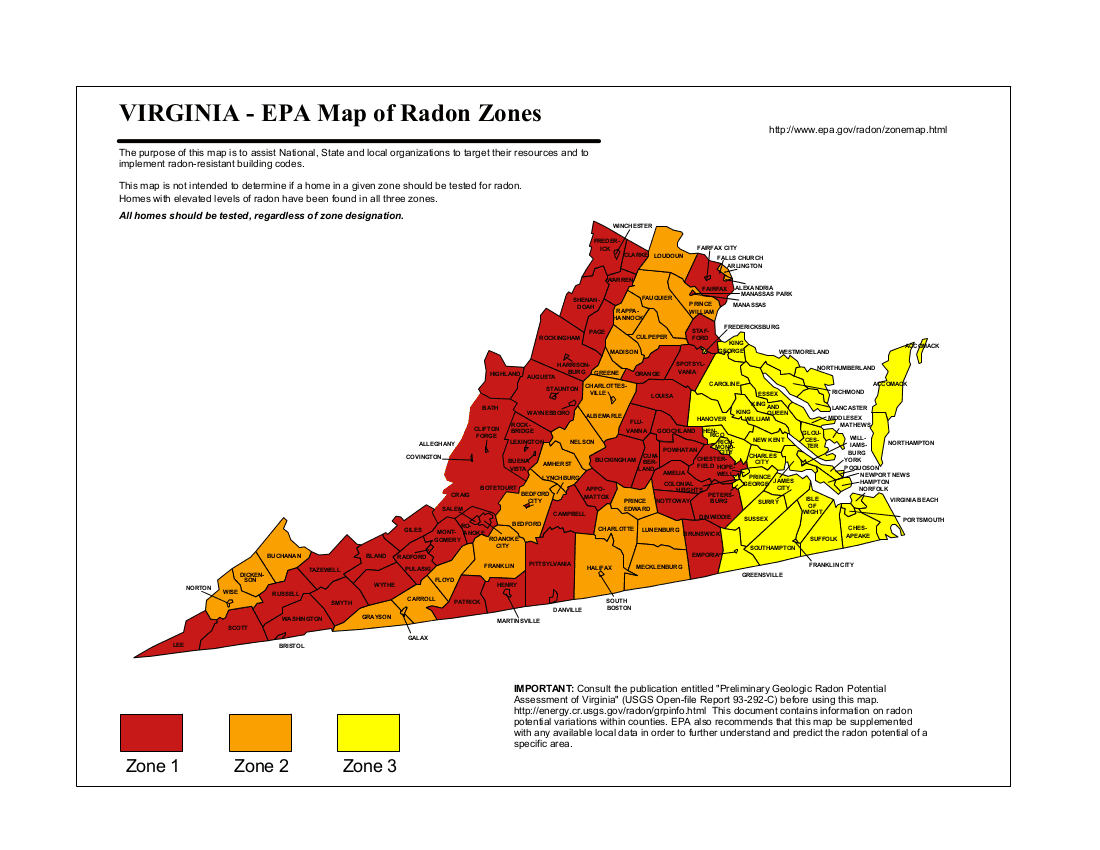
Chesterfield County is classified as an EPA Zone 1 area, meaning it has the highest potential for elevated radon levels (above 4.0 pCi/L).

Additionally, Central Virginia—including Chesterfield—has been identified as a region with elevated radon risk due to underlying geology.

What Are Typical Radon Levels?

  • Average indoor Radon in Chesterfield: ~3.1 pCi/L
  • EPA action level: 4.0 pCi/L
  • WHO reference level: 2.7 pCi/L

That means Chesterfield homes often sit right on the edge of concern, and many homes exceed safe levels.


What Is Radon and Why Should You Care?

Radon is a naturally occurring radioactive gas that forms when uranium in soil breaks down. It rises through the ground and can enter homes through:

  • Foundation cracks
  • Gaps around pipes
  • Sump pits
  • Crawlspaces

Since it's a naturally occurring gas, it is found everywhere, including in outdoor air. However, it's the radon concentrations inside our homes that can pose serious health risks. Once inside, it can build up—especially in basements and lower levels.

In fact, Radon is the second leading cause of lung cancer in the U.S., making it a serious concern for homeowners.


Why Radon Levels Fluctuate (And Why That Matters)

One of the biggest misconceptions about Radon is that it's static. It's not.

Radon levels can change based on:

Seasonal Changes

  • Higher in winter (homes sealed tight)
  • Lower in summer (more ventilation)

Weather Conditions

  • Rain and pressure changes can push Radon into homes

Soil & Geology

Radon originates from the ground, so even small differences in soil composition can dramatically impact levels.

👉 Bottom line: A single short-term test gives you a snapshot—not the full picture.

In a Nutshell

Chesterfield is in an EPA Zone 1, meaning there's a high risk of homes having too much radon. The only way to know is to test. Radon is the second leading cause of lung cancer. 

God. Family. Home
© 2012 A House on a Rock Home Inspections. All rights reserved.